INFORMATION ABOUT OUR DISCONTINUED RIM STRIP PRODUCTS
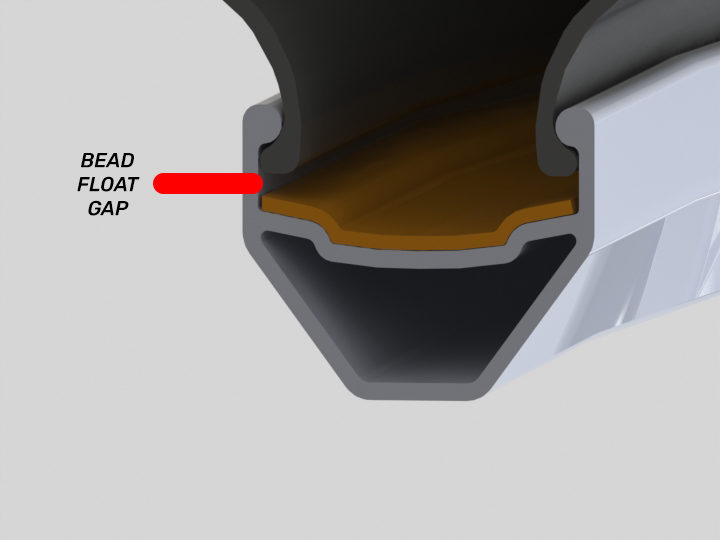
Since the advent of the pneumatic tire, inner tubes have been an integral component of the bicycle wheel. ETRTO (the European Tire and Rim Technical Organization) was established in 1964 and set design standards for bicycle rims to make sure that, even with the wide variance of tolerances in rim and tire manufacturing, a tire and rim marked the same size will go together safely. To accomplish this, a traditional bicycle rim will have a somewhat tall sidewall along which the tire bead will settle when inflated, held securely in place by the air pressure in the tube. We call this area along the rim wall between the rim bed and bead hook the "bead float gap." (Fig.1).
Now consider a tubeless set-up on that rim: if the bead has room to move by design, how do you create an airtight seal? Even if you can get it inflated, how does the bead stay in place while riding and not “burp”? These questions led Stan to design our conversion rim strips: molded, extruded rubber strips that effectively re-shape a traditional rim to eliminate the bead float gap and create a secure, airtight fit with the tire. The Stan’s NoTubes Tubeless System was born! (Fig. 2)
Compared to UST (the only tubeless system on the market for mountain bikes at the time) that used proprietary rims and tires, our “Shape, Tape, and Sealant” approach was lighter, better performing, and allowed riders choice. In 2004, we made our first BST (Bead Socket Technology) rims, building the “shape” part of our system into the rim itself and eliminating the need for the re-shaping strip (Fig. 3).
Since then, tubeless technology has evolved to become the standard for performance bicycles. While the full BST profile is covered by 6 separate patents and makes Stan’s rims the overall best-performing tubeless rims available, its core concept (elimination of the bead float gap) is the basis for the vast majority of tubeless and "tubeless-ready" rims and wheels on the market today.
In 2019 we made the decision to discontinue production on our conversion strips, as tubeless-ready rims and wheels can now be found stock on shop-quality bicycles at almost all price levels. Should you have an older bicycle that you wish to convert, there are still plenty of rim strips and kits out in the world: in fact there is a good chance that your local shop has what you might be looking for on their wall or in a drawer next to the workbench . To help you on your search here is some info on the different strips we made, what they should fit, and what each strip was called over the years they were produced. Most were sold in a complete kit (2 strips, 5yd of 12mm Yellow Tape, and a 16oz bottle of sealant) as well as individually.
Downhill Rim Strip: 38mm extrusion, 52” loop, schrader valve
These strips were thin “problem solver” strips for rims that needed minimal re-shaping. The Olympic Strip was most commonly used to run non-UST tires on 26” UST mountain bike wheels.The Alpha Cross strip enabled the use of standard (non-tubeless) cyclocross tires on our own Alpha road rims. The Flow strip was helpful for more aggressive riders who were experiencing the occasional burping issue when using non-tubeless tires on 26” or 27.5” tubeless-ready rims. The Downhill strip fit older 26” downhill rims such as the Mavic D321.
Please note: when doing a conversion, it is strongly recommended that you read the instructions and watch our tech video before starting. Reviewing these materials and following the steps laid out therein will go a long way to making your conversion an easy, painless process. As always, you can contact us with any questions.
FREQUENTLY ASKED QUESTIONS:
Can I convert my non-tubeless mountain bike rim to tubeless with tape and valve only or will I need a rim strip?
No. "Tape & Valve" conversions are only appropriate with rims that are labelled as "Tubeless Ready," "Tubeless Compatible," or similar. The BST (Bead Socket Technology) profile developed by Stan's NoTubes was a departure from traditional bicycle rim design and its core concept is the basis for the vast majority of "tubeless-ready" rims and wheels on the market today. Stan's Yellow Tape is not, by itself, a tubeless conversion for older, traditional, non-"tubeless-ready" rims. These older rims require the use of a Stan’s NoTubes Rim Strip (now discontinued) to re-shape the rim bed to achieve a safe, secure tubeless setup This reshaping creates a much more secure BST-like fit between the tire and the rim, allowing for easier inflation/setup and eliminating burping.
What is burping?
Burping is the rapid air loss that occurs when the tire bead becomes separated from the rim while riding. Our conversion rim strips and BST rims are designed to offer a secure fitment between the rim and tire bead, eliminating burping.
I can't get my tire inflated
Watch the Tubeless Kit Installation Video. Make sure that the tire beads are sitting on either side of the valve hole and not covering it, thereby impeding or redirecting the airflow. Removing the valve core will increase the airflow through the valve for a quicker burst of air to make inflation easier, but keep in mind that a compressor may be necessary to inflate some tires. Use soapy water on the tire bead to help the tire slip onto the bead seat. Conversely, if the tire fits loosely with the rim strip installed it may be necessary to build up the center channel of the rim with a layer of Velox tape or similar.
How can I easily add sealant to my UST wheelset?
If the valves that came with your wheels feature a removable core, you can add sealant directly through the valve using our sealant injector. Stan’s Universal Valves feature a removable core and will work with your UST rim and allow you to add sealant without breaking the bead. If using Race sealant, you must add sealant to your tire before fully installing it on the rim, as that formula cannot flow through a valve stem due to its high crystal content.